
Use this guide to choose an educational science kit for a child, set up one activity, and help them complete it safely. It is written for parents, caregivers, and educators with no special science background. Allow 30-60 minutes for choosing and doing a short activity; some kits need extra setup or waiting time.

Prime made for students and young adults
- Fast, free delivery for dorm and study essentials
- Prime Video and Amazon Music included
- Member-only deals
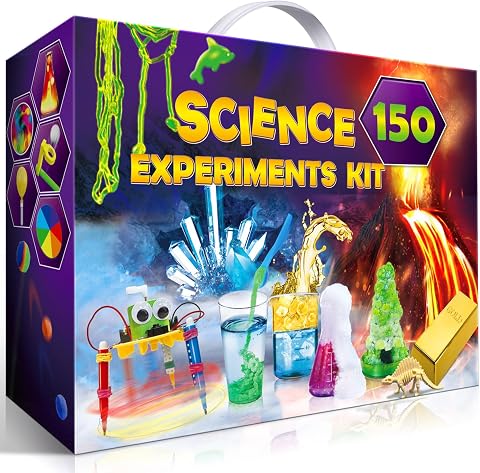
UNGLINGA 150 Experiments Science Kit for Kids – Chemistry Lab STEM Toys
- ✔ Brand: UNGLINGA
- ✔ Recommended age: 8 years and up
- ✔ Experiments: 150

Doctor Jupiter Preschool Science Kit for Ages 3+
- ✔ Brand: Doctor Jupiter
- ✔ Recommended age: 3 years and up
- ✔ Activities: 100+
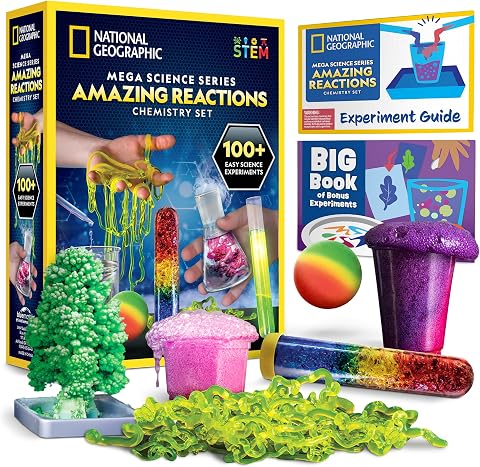
National Geographic Amazing Chemistry Set, 100+ Experiments, Ages 8+
- ✔ Brand: Blue Marble
- ✔ Recommended age: 8 years and up
- ✔ Experiments: 100+ total: 15 with included materials and 85 using household items
Difficulty: Beginner | Time: 30-60 minutes, plus kit setup time
What You’ll Need
Tools & Materials:
- A science kit suited to the child’s age and interests
- The kit’s instruction booklet
- A clear, washable work surface
- Water and household items listed in the instructions
- Safety glasses or gloves if the kit requires them
- Paper and pencil for observations
Knowledge:
- Basic ability to read the kit instructions and supervise the child
- Awareness of the child’s allergies, sensory needs, and ability to handle small parts
Check the full activity instructions and parts list before opening sealed materials. Set aside the time the instructions recommend, including drying, cooling, or growing time. An adult should handle any hot equipment, sharp tools, batteries, or substances marked for adult use.
UNGLINGA 150 Experiments Science Kit for Kids – Chemistry Lab STEM Toys
For school-age children ready to move among different topics, the UNGLINGA 150 Experiments Science Kit has the broadest stated scope in this lineup. Its activities cover chemistry, physics, earth science, and more, giving families a way to explore several branches of science rather than staying with one theme. That breadth is why we place it first for an all-around educational kit. The illustrated, step-by-step manual also gives children a path through each project, which can make a large activity collection more approachable.Compared with the National Geographic chemistry set, UNGLINGA is less narrowly focused and lists more experiments, so it may better suit a child whose interests change from week to week. Its stated age recommendation is 8 and up, however, so it is not the right pick for preschool exploration; Doctor Jupiter is designed specifically for that stage. The listed contents include tools and materials, but some experiments still require household items. Families should also expect that certain projects can be messy, and the plastic components may feel inexpensive. We see this as the most versatile option, with a tradeoff in preparation and cleanup.
Pros:
- Lists 150 experiments across chemistry, physics, earth science, and other topics.
- Includes tools, materials, and an illustrated step-by-step manual.
- Designed to encourage hands-on exploration for ages 8 and up.
Cons:
- Some experiments may need additional household items.
- Plastic components may feel inexpensive, and some projects can be messy.
Best for: Children ages 8 and up who want to explore several areas of science through a large collection of guided activities.
Not ideal for: Preschoolers, families looking for a chemistry-only kit, or anyone who wants every experiment to use only materials supplied in the box.
Bottom line: Choose UNGLINGA when variety across science topics matters more than avoiding occasional extra supplies and cleanup.
“Choose UNGLINGA when variety across science topics matters more than avoiding occasional extra supplies and cleanup.”
Doctor Jupiter Preschool Science Kit for Ages 3+
Doctor Jupiter fills the youngest age niche in this comparison: it is designed for children ages 3 and up, with more than 100 activities involving colors, bubbles, water, motion, sound, and simple reactions. The themes make science tangible through mixing, pouring, and observing. Beakers, cups, stirring sticks, a funnel, a spray bottle, and a bubble wand support that kind of hands-on discovery. For a preschooler, this accessible sensory range is a clearer fit than the older-child focus of UNGLINGA or National Geographic.The illustrated instructions and online activity access can help an adult guide play, while the kit is described as supporting screen-free learning. That guidance matters: the age range and preschool focus suggest a different level of complexity from the 8+ kits. The tradeoff is that children who have outgrown basic exploration may find these activities too simple. Its 100+ activity count also does not tell us that every activity has all its materials included, so families should review the instructions and plan to supervise. We rank it second overall because it serves a narrower age group exceptionally clearly, rather than offering the broadest school-age science coverage.
Pros:
- Offers more than 100 activities covering colors, bubbles, water, motion, sound, and simple reactions.
- Includes a range of tools for mixing, pouring, and observing.
- Illustrated instructions and online activity access support adult-guided play.
- Designed for age-appropriate, screen-free exploration.
Cons:
- Activities may be too simple for older children.
- The stated age range begins at 3, so it is not presented as a kit for younger toddlers.
Best for: Preschool children ages 3 and up who learn through simple, guided sensory activities with an adult nearby.
Not ideal for: Older children seeking more challenging experiments, or families who want an independent activity set for school-age learners.
Bottom line: Choose Doctor Jupiter when preschool age fit and sensory discovery matter more than advanced concepts or broad school-age challenges.
“Choose Doctor Jupiter when preschool age fit and sensory discovery matter more than advanced concepts or broad school-age challenges.”
National Geographic Amazing Chemistry Set, 100+ Experiments, Ages 8+
Children who are particularly curious about reactions, color changes, or crystals may prefer the National Geographic Amazing Chemistry Set. It includes tools such as test tubes, beakers, and pipettes, plus materials for 15 experiments, including a crystal tree, color-changing solutions, glowing test tubes, and a bouncy ball. The examples give this set a defined chemistry identity. Compared with UNGLINGA’s cross-subject assortment, it trades breadth for a more concentrated theme; that focus can be helpful when a child already wants to explore chemistry.The important buying distinction is that “100+ experiments” combines 15 experiments with included materials and 85 additional activities that use common household items. Those extra projects can extend the learning, but they require families to source supplies themselves. That makes the kit less self-contained than the product count might first suggest, and less suitable for households seeking a complete set of materials for every activity. It is also intended for ages 8 and up, unlike Doctor Jupiter’s preschool activities. We rank it third overall because it is a useful subject specialist, while UNGLINGA offers broader coverage and makes a stronger all-purpose choice for varied interests.
Pros:
- Includes materials for 15 chemistry experiments.
- Adds 85 activities that can be done with common household items.
- Supplies test tubes, beakers, and pipettes for hands-on projects.
- Features varied chemistry activities such as crystal growing and color-changing solutions.
Cons:
- Materials for the 85 additional experiments are not included.
- Its chemistry focus is narrower than UNGLINGA’s multi-subject offering.
Best for: Children ages 8 and up who want to focus on chemistry and are comfortable doing some projects with household supplies.
Not ideal for: Families seeking broad coverage across science subjects or a kit that supplies materials for all listed experiments.
Bottom line: Choose National Geographic for a chemistry-minded child who values a focused theme and does not mind gathering supplies for many activities.
“Choose National Geographic for a chemistry-minded child who values a focused theme and does not mind gathering supplies for many activities.”
As an Amazon Associate we earn from qualifying purchases.
Before You Start
Pick an activity that matches the child’s age, attention span, and interests. A child who likes animals may enjoy a habitat or microscope activity; a child who likes building may prefer circuits or engineering. Age labels are a starting point, so check the listed skills, reading level, and small-parts warnings as well.
Keep the activity within the kit’s instructions. Do not taste materials, mix substances from different activities, or substitute household chemicals. Follow the package label if it gives stricter safety instructions.
Step-by-Step Instructions
Step 1: Choose a suitable kit
Read the age range, activity list, and required-materials section on the box or product page. Choose a kit with at least one activity the child can complete with the adult support available. Check that the theme interests the child and that the kit does not rely on skills they have not practiced, such as precise measuring or reading long directions.
Tip: For a first kit, favor a small number of complete activities over a large set with many loose parts.
Check: You can name an activity the child wants to try and identify which parts need adult help.
Step 2: Check contents and safety labels
Open the kit on a clear surface and compare its contents with the parts list. Read every warning and note any required household supplies, protective gear, disposal directions, or adult-only steps. Put small pieces away from children who might mouth them, and keep pets away from the work area.
Tip: If an essential piece is missing or damaged, contact the seller or manufacturer before starting that activity.
Check: The parts are accounted for, the safety directions are clear, and you have the materials needed for the chosen activity.
Step 3: Prepare the workspace
Cover a stable table with a washable mat or paper. Gather only the materials listed for the activity, place a bowl or bin nearby for used parts, and keep food and drinks off the table. Set out paper and a pencil so the child can record what they notice.
Tip: Choose a surface with enough room to follow the steps in order without moving active materials around.
Check: The activity area is uncluttered, supplies are within reach, and anything that could be damaged or contaminated has been moved away.
Step 4: Read the procedure together
Read the activity instructions before handling the materials. Point out the order of the steps, any waiting periods, and the parts the adult must do. Ask the child what they think will happen, then write down or sketch their prediction before beginning.
Tip: If a direction is unclear, pause and check the kit’s troubleshooting notes or contact the manufacturer. Do not guess about quantities, temperatures, or chemical combinations.
Check: You and the child can explain what you are trying, what to do first, and when adult help is needed.
Step 5: Complete the activity one step at a time
Invite the child to handle the age-appropriate tasks, such as sorting parts, measuring safe materials, or making observations. Follow the printed directions in order and supervise throughout. Keep the child from touching their face or mouth during the activity, and wash hands afterward.
Tip: Let the child do the thinking and observation. Step in for the specific safety tasks described by the instructions rather than taking over the whole activity.
Check: The activity reaches the outcome described in the booklet, or you can identify the step where the result differed.
Step 6: Record and discuss what happened
Ask the child to describe what changed, what stayed the same, and whether the result matched their prediction. Use the kit’s explanation to connect the observation to the science idea. Write or draw one finding together, using the child’s own words when possible.
Tip: A result that differs from the prediction can still be useful. Focus on what the child observed and which steps may have affected the outcome.
Check: The child can point to an observation and say how it relates to the activity’s question or concept.
Step 7: Clean up and store the kit
Follow the booklet’s directions for disposing of materials, cleaning reusable parts, and storing or charging components. Seal small pieces in their labeled bags and keep the instructions with the kit. Wash hands and wipe the work surface after cleanup.
Tip: Do not pour materials down a drain or put them in household waste unless the instructions say that disposal method is suitable.
Check: Reusable parts are clean and dry as directed, waste is handled according to the instructions, and the kit is ready to store safely.
Common Mistakes to Avoid
- Choosing a kit by age label alone. — Read the activity requirements and warnings, then match them to the child’s interests, reading ability, and need for adult support.
- Starting before checking the parts and household supplies. — Compare the contents with the parts list and gather required supplies before beginning.
- Skipping steps or changing quantities to make the activity faster. — Follow the sequence and measurements in the booklet; they may affect both safety and the result.
- Treating an unexpected result as failure. — Record what happened and review the steps. Comparing the result with the prediction is part of learning.
Troubleshooting
Problem: A required part or material is missing.
Solution: Check the packaging and all compartments once more. If it is still missing, pause that activity and contact the seller or manufacturer for a replacement; do not substitute an unlisted material.
Problem: The activity does not produce the expected result.
Solution: Review the order, quantities, timing, and setup against the booklet. Repeat only if the instructions allow it and you have enough materials. Record the difference and ask the manufacturer if a kit component may be faulty.
Problem: The child finds the instructions too difficult or loses interest.
Solution: Read one step at a time, demonstrate a safe action, and let the child take a short break. If the kit remains a poor fit, switch to a shorter activity from the same kit rather than rushing through.
Problem: A material spills or contacts skin or eyes.
Solution: Stop the activity and follow the kit label’s first-aid directions. Get adult help immediately; for eye exposure, ingestion, or a reaction, follow the product guidance and contact local poison-control or emergency services as directed.
What Success Looks Like
The child completes an activity by following the kit directions with suitable adult supervision, observes and records what happened, and can describe one thing they learned. The materials are cleaned up and stored or discarded as the booklet directs. The result does not need to match a prediction for the activity to count as successful learning.
Next Steps
Choose another activity from the kit that builds on the first observation, or let the child explain the result to someone else. Check the kit after each use, replace missing parts through the manufacturer, and store it where small pieces and materials are inaccessible to younger children. If the child wants to explore the idea further, use a library book or a teacher-approved resource suited to their age.
Frequently Asked Questions
What age is best for a science kit?
Use the manufacturer’s age guidance as a starting point, then check reading demands, small parts, and adult supervision notes. A younger child may enjoy a kit with adult-led setup and simple observations; an older child may prefer a project with measuring, building, or recording results.
Should I help the child or let them work alone?
Stay present and provide the supervision the label requires. Let the child do safe, age-appropriate tasks while an adult handles steps marked for adults, hot items, sharp tools, or other hazards.
Can I replace a missing kit material with something at home?
Only use a substitute if the manufacturer’s instructions explicitly allow it. Materials that look similar can behave differently, so pause the activity and ask the manufacturer when the booklet does not give an approved alternative.
What should we do if the experiment does not work?
Compare each step with the instructions, including measurements and waiting time. Note what happened and check the kit’s troubleshooting guidance. An unexpected outcome can still teach the child how observations compare with a prediction.
How do I know whether the child learned something?
Ask the child to describe one thing they observed and connect it to the activity’s question. They do not need to use technical vocabulary or get the predicted result to show learning.